
Laboratory
Imaging of Nanomaterials
The Chemical Engineering Module will teach you the use of atomic force microscopy (AFM) for the imaging of nanomaterials. You will learn to prepare samples for the AFM, to operate the AFM, and to interpret data obtained with the AFM. (ADD PDF LINK)
Pre-lab Exercises
Be prepared to answer these questions before coming to the lab. We will discuss the answers during the first laboratory session.
1. Review lecture notes from ChE 59808 Nanomaterials Course (available on blackboard): Nanoparticles_Size-dependent_effects.pdf.
2. How many hydrogen atoms would you have to line up to make one nanometer?
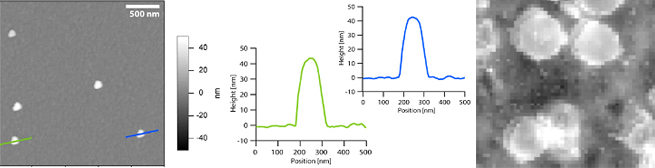
3. The AFM image below was taken by a student to measure the size of gold nanoparticles on the surface. What are the dimensions of the nanoparticle?
4. Another student took the AFM image shown to the bellow. Explain what has gone wrong!
5. What is the force constant of the cantilever you will be using in this module?
6. What force does it take to deflect such a cantilever by 1 nm?
7. How does the AFM scan the tip across the surface?
8. If you are scanning an 80x80 mm2 area with 512 lines and 512 points per line, what is the resolution of your image (specify in both mm and nm)?
Lab Exercises
Experiment 1: Drop Casting of Nanoparticle Samples
In this experiment you will prepare AFM samples by drop casting (see scientific article provided) the aqueous solutions of gold particles onto a silicon wafer piece.
1. Remove a piece of silicon from the beaker.
2. Blow-dry the piece of silicon using the nitrogen gun.
3. Use an Eppendorf pipette provided by the TA to remove 10 ml of solution from the gold nanoparticle solution.
4. Carefully place the droplet on the silicon wafer surface.
5. Place the wafer in a safe spot and let the droplets dry (~15 min).
6. Place wafer in distilled water for 5 min.
7. Blow dry with nitrogen.
Experiment 2: Learning to image with AFM
In this experiment you will image one of the two test samples provided by NanoSystems using the Easy Scan 2 AFM System.
Read the instructions below carefully and follow them closely. If you are uncertain about anything, please consult your TA first.
AFM imaging of Test Samples
Use AFM contact mode to image the test sample, take images of 3 different areas, perform a cross-section analysis using the topography images and determine the average feature size.
1. Pick one of the two test samples (CD piece or grating).
2. Place the test sample on the AFM translation stage on top of a double-sided sticky tape.
3. System set-up: follow the start up procedure in Easy Scan 2 AFM System SOP (Standard Operational Procedure) steps 1-9.
a. Use a contact-mode cantilever (CL-25).
b. Operating mode: static force (contact mode).
c. Lower the stage by clicking Advance in the Approach panel until you see the shadow of your cantilever.
4. Set scan area to 60 mm, set time to 0.5 sec, and adjust rotation as needed. Note, a negative slope requires a negative rotation for leveling of the sample.
5. Save the image by clicking photo and wait until the scan has reached the end.
6. Zoom-in on the sample by clicking zoom in the imaging bar and use mouse cursor to define the area of interested. Then, double-click zoom area of interest.
7. Scan the selected area.
8. Save the image.
9. Increase the scan area back to 60 mm and repeat steps 5-8 twice more.
10. Withdraw the cantilever until you can see a separation between the cantilever and its shadow.
11. Retract the cantilever as far as possible.
Experiment 3: Size and Size Distribution of Gold Nanoparticles
In this experiment you will image the gold nanoparticle sample prepared in Experiment 1 using the Easy Scan 2 AFM System.
AFM imaging of the nanoparticles
Use AFM contact mode to image the nanoparticle sample, determine the diameters of at least 10 particles, and perform the cross-section analysis using the topography images and determine the average particle size.
12. Follow steps 2 – 11 of Experiment 2 using the nanoparticle sample.
AFM shut down
13. Follow the Easy Scan 2 AFM System SOP Shutdown Procedure
14. Dispose all of the samples properly.
15. Perform the Post-Lab exercises and turn them in with your lab report for the Chemical Engineering - Module 3.
Post-Lab Exercises
Use the images obtained in Experiments 2 & 3 and the SPIP software to complete the following post-lab exercises.
1) Process the images taken and perform cross-section analysis using the options under the Tools tab. Keep in mind that you want to obtain the following information:
Test Sample:
• Cross-section profile of your test sample
• Dimensions of features on your test sample (report average width and height with standard deviation)
Gold Nanoparticle Samples
• Cross-section profile of your particles
• Dimensions of your particles (report average diameter and height with standard deviation)
2) Compare the quality of the images taken with the test sample with those taken for the gold nanoparticles. Discuss similarities and differences in image quality.
This manual has been adapted from the Lab Unit 1 manual of the NUE UNIQUE “Nanoscience on the tip” workshop developed and held by University of Washington, Seattle.